Get Ready To Digitize Your Art
Before you start digitizing, you need to get ready. Think about your design and what you want it to look like when it is stitched on fabric. Start by drawing a simple picture on paper. Make sure your lines are clear and your shapes are big enough for the machine to read. When you have a neat drawing, you are ready to start the digitizing journey!
Digitizing is like turning your drawing into a secret code that tells an embroidery machine where to stitch. It is a fun way to bring your ideas to life. All you need is a good drawing and a computer program that helps you change your picture into a digital file.
Make Your Design Simple And Clear
One of the most important things about digitizing is having a design that is easy to understand. When you draw your picture, try to keep it simple. Avoid too many small details because the embroidery machine may have trouble reading them. Use big shapes and bold lines. This makes your design stand out and helps the machine create clean stitches.
A simple design is like a clear map. When the map is easy to read, it is easier to follow. In the same way, if your design is clear, the embroidery machine can follow your lines perfectly. Remember, less is more when you are making your art ready for digitizing.
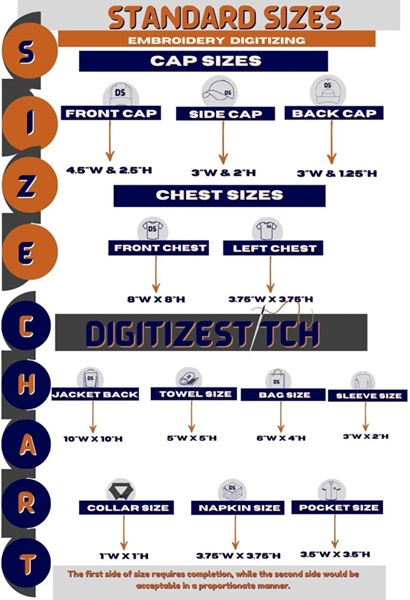
Use An Embroidery Size Chart For The Best Fit
An embroidery size chart is a very helpful tool. It shows you what size your design should be for different items, like a hat, a shirt, or a bag. This chart tells you how big your design must be so that every detail can be seen clearly. If your design is too small, it might look blurry or miss important parts. If it is too big, it might not fit on your item.
Look at the embroidery size chart before you digitize your design. The chart will help you decide the best size for your project. For example, a design for a cap might need to be smaller than one for a t-shirt. Using an embroidery size chart ensures that your design will look perfect no matter where it goes.
How To Prepare Your Artwork For Digitizing
Once you have a simple and clear drawing, you need to prepare it for digitizing. This means cleaning up your artwork so that the computer can read it easily. Follow these steps:
Outline Your Design
Use a dark marker or pen to go over your drawing. This makes the lines bold and clear.
Erase Extra Marks
Remove any stray pencil marks or smudges. A clean drawing is easier for the computer to understand.
Scan Your Artwork
Use a scanner or take a clear picture of your drawing. Make sure the image is sharp and not blurry.
Save The File
Save your scanned image on your computer. This file will be used in the next steps.
By following these steps, you will have a clean and clear image of your design ready for digitizing.
Tools To Digitize Your Embroidery Design
After you have prepared your artwork, it is time to use a computer program to digitize it. There are many programs available that can help you turn your drawing into a digital file. These programs let you trace over your design, set the colors, and adjust the stitches. Here are some simple steps to follow:
Open The File
Start your computer program and open the scanned image of your artwork.
Trace The Design
Use the program’s tools to trace your design. Follow the bold lines you made with your marker.
Set The Colors
Choose the colors for your design. Make sure you use bright and clear colors that will show up well on fabric.
Save As A Digital File
Once you are happy with your traced design, save it in a format that your embroidery machine can read.
Using these tools, you can create a digital file that tells the embroidery machine exactly where to stitch each line and color.
Ask For Help From Embroidery Digitizing Services USA
Sometimes, digitizing your design can be a little tricky. If you are having trouble or want your design to be perfect, you can ask for help. There are experts who offer embroidery digitizing services USA. These professionals know how to take your artwork and turn it into a perfect digital file.
Here is why you might choose to use these services:
- Expert Touch: Professionals know how to simplify your design and remove extra details that may cause problems.
- Time Saver: Let experts handle the digitizing so you can focus on other creative parts of your project.
- High Quality: They make sure your digital file is clean and ready for any embroidery machine.
By using embroidery digitizing services USA, you can be sure that your design will be stitched beautifully every time.
Find Inspiration In Machine Embroidery Designs
Looking at other designs can give you new ideas for your artwork. Many people share their machine embroidery designs online. These designs are made to be stitched by machines, and they show how simple lines and shapes can create beautiful patterns.
When you explore machine embroidery designs, try to notice:
- How Colors Are Used: See how the designs use only a few bright colors.
- Simple Lines: Notice that many great designs have clear, bold lines.
- Balanced Patterns: Look for designs that are balanced and not too crowded.
You can use these ideas to improve your own design. The goal is to create a design that is not only beautiful but also easy for the machine to stitch. Let machine embroidery designs inspire you to make something amazing.
Practice And Test Your Design
Practice is very important when you are learning to digitize embroidery designs. Once you have your digital file ready, it is a good idea to test it on a small piece of fabric. This testing phase helps you see if your design looks as good in stitches as it does on your computer screen.
Here’s how to test your design:
- Choose A Small Fabric Sample: Pick a small piece of fabric that you want to use for your test.
- Set Up Your Embroidery Machine: Make sure your machine is ready and has the right thread colors.
- Stitch A Sample: Run your digital file on the fabric sample.
- Check The Result: Look at the stitched design. Are the lines clear? Are the colors bright? Is every detail as you wanted?
If something does not look right, you can go back to your digital file and make changes. Testing is a key step that helps you improve your design before you stitch it on a larger project.
Learn From Each Project
Every time you digitize a design, you learn something new. Even if your first project does not turn out perfectly, you gain experience. Here are some tips to learn from your projects:
- Keep A Notebook: Write down what worked well and what did not.
- Make Small Changes: Try changing one thing at a time in your design and test again.
- Ask For Feedback: Show your design to family or friends and ask for their opinions.
- Practice Often: The more you practice, the better you will get at digitizing.
Learning from each project will help you create even more stunning embroidery designs in the future.
Organize Your Files And Designs
After you have digitized your design, it is important to keep your files organized. This makes it easier to find your work later or to share it with others. Here are some simple tips:
- Create Folders: Make a folder on your computer for all your embroidery designs.
- Name Your Files Clearly: Use clear names like “Flower Design” or “Simple Logo.”
- Back Up Your Files: Save a copy of your files on a USB drive or cloud storage.
Keeping your files organized saves time and makes your creative process smoother.
Use The Embroidery Size Chart For Different Projects
Remember the embroidery size chart we talked about earlier? This tool is very useful when you want to use your design on different items. For example, the size that works best for a hat might not be the best for a t-shirt. Use the embroidery size chart to adjust your design for each project.
Here is how to use it:
- Check The Chart: Look at the chart to see the recommended sizes for different items.
- Resize Your Design: Use your computer program to change the size of your design.
- Test Again: Run a test stitch on a fabric sample to make sure the new size works well.
Using the embroidery size chart ensures that your design looks great on every item you choose.
Explore More Machine Embroidery Designs
Exploring more machine embroidery designs can give you even more ideas. Many websites and online communities share free designs that you can study. Look at how the designs are made and notice the simple techniques that make them work.
Machine embroidery designs show that even complex patterns begin with basic lines and shapes. You can use these ideas to improve your own work and create designs that are both stunning and easy to digitize.
Final Thoughts And Next Steps
Digitizing stunning embroidery designs is a fun and creative journey. It starts with a simple drawing and goes through many steps to become a digital file that an embroidery machine can use. Design clearly and simply. Use an embroidery size chart to select the right size. You might also consider embroidery digitizing services USA for extra help. This will let you create beautiful art that shines on fabric.
Remember these key points:
- Start Simple: Make your artwork easy to understand with clear, bold lines.
- Prepare Carefully: Clean your drawing and scan it properly.
- Use The Right Tools: Turn your artwork into a digital file with a good computer program.
- Test Your Design: Always run a test stitch to see if your design works well.
- Learn And Improve: Use every project as a chance to learn and get better.
- Get Inspired: Look at other machine embroidery designs for ideas and tips.


Leave a Reply